Printing the Nozzle Check Pattern
FAQ ID: 8201375100
Release date: 27 January 2012
Solution
Printing the Nozzle Check Pattern
Print the nozzle check pattern to determine whether the ink ejects properly from the print head nozzle.REFERENCE
- If the remaining ink level is low, the nozzle check pattern will not be printed correctly. Replace the FINE cartridge whose ink is low.
-> [ Replacing a FINE Cartridge ]
You need to prepare: a sheet of A4 or Letter-sized plain paper
1. Make sure that the power is turned on.
2. Load a sheet of A4 or Letter-sized plain paper in the front tray.
3. Open the output tray extension, open the paper output tray, then extend the paper output support.
4. Print the nozzle check pattern.
(1) Press the Setup button.
The Setup menu screen will appear.
(2) Use the  or
or  button to select Maintenance, then press the OK button.
(3) Use the  or
or  button to select Nozzle check, then press the OK button.
The nozzle check pattern will be printed.
5. Examine the nozzle check pattern.
Refer to [ Examining the Nozzle Check Pattern ] within this webpage.
REFERENCE
- To access other available functions, use the mode buttons.
Examining the Nozzle Check Pattern
Examine the nozzle check pattern, and clean the print head if necessary.
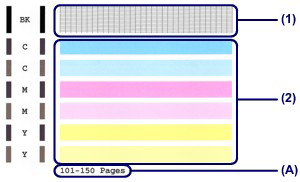
1. Check if there are missing lines in the pattern (1) or horizontal white streaks in the pattern (2).
(A) Number of sheets printed so far
- If there are missing lines in the pattern (1):
Cleaning the print head is required.
-> [ Cleaning the Print Head ]
(B) Good
(C) Bad (lines are missing)
If there are horizontal white streaks in the pattern (2):
Cleaning the print head is required.
-> [ Cleaning the Print Head ]
(B) Good
(C) Bad (horizontal white streaks are present)
REFERENCE
- The total number of sheets printed so far is shown in increments of 50 sheets on the printout of the nozzle check pattern.
Applicable Models
- PIXMA MX374
- PIXMA MX375