An Error Message Is Displayed on the LCD
FAQ ID: 8200815900
Release date: 15 July 2010
Details
If an error message is displayed on the LCD, take the corresponding action described below.
Helpful Information
The ink may have run out. Replacing the ink tank is recommended. U041
Print head is not installed. Install the print head. U051 / The type of print head is incorrect. Install the correct print head. U052
Some ink tanks are not installed in place U072 / More than one ink tank of the following color is installed U071
The remaining level of the ink cannot be correctly detected. Replace the ink tank. U130
The following ink tank cannot be recognized. U043 U140 U150
Appropriate ink tank is not installed. Install the appropriate ink tank U141
The ink has run out. Replace the ink tank. U163
Data of supported types are not saved.
Cannot print the specified PDF file. The format is not supported or the file is too large
The specified PDF file contains unprintable data. Some portions may not be printed.
Inner cover is open. Close the inner cover and press OK
The ink absorber is almost full. Press OK to continue printing. Contact the service center
Printer error has occurred. Contact the service center
Timeout error has occurred
Incompatible device detected. Remove the device
Auto head align has failed. Press OK and repeat operation. <See manual>
An unsupported USB hub is connected. Remove the hub.
B200 Printer error has occurred. Unplug the power cord and contact the service center
**** Printer error has occurred. Turn off power then back on again. If problem persists, see the manual
Scanner is not operating correctly
The card is currently writable from PC. Set to [Not writable from PC]
Power was not turned off correctly the last time. Press the ON button when turning power off
Cannot print the data
Open the inner cover, set the disc tray and press OK
Solution
The ink may have run out. Replacing the ink tank is recommended. U041
If the lamp on the ink tank is flashing, ink may have run out.
Replacing the ink tank is recommended.
If printing is in progress and you want to continue printing, press the machine's OK button with the ink tank installed. Then printing can continue. Replacing the ink tank is recommended after the printing. The machine may be damaged if printing is continued under the ink out condition.
-> [ Replacing an Ink Tank ]
NOTE
- If multiple ink lamps are flashing red, refer to [ Checking the Ink Status ] and check the status of each ink tank.
Print head is not installed. Install the print head. U051 / The type of print head is incorrect. Install the correct print head. U052
Follow the directions given in your setup sheet to install the Print Head.
-> [ Initial Hardware Setup ]
If the Print Head is already installed, remove the Print Head once and then reinstall it.
If the error is not resolved, the Print Head may be damaged. Contact the service center.
Some ink tanks are not installed in place U072 / More than one ink tank of the following color is installed U071
- Some ink tanks are not installed in the correct position. (The lamp on the ink tank flashes.)
- More than one ink tanks of the same color are installed. (The lamp on the ink tank flashes.)
Confirm that the ink tanks are installed in the appropriate positions.
When remaining ink cautions or errors occur, the message will appear to inform you of the error.
Refer to [ An Error Message Is Displayed on the LCD ]
- Replacing Procedure
When you need to replace ink tanks, follow the procedure below.
IMPORTANT
Handling ink
- If you remove an ink tank, replace it immediately. Do not leave the machine with ink tanks removed.
- Use new ink tanks for replacement. Installing used ink tanks may cause the nozzles to clog. Furthermore, with such ink tanks, the machine will not be able to inform you when to replace the ink tanks properly.
- Once an ink tank has been installed, do not remove it from the machine and leave it out in the open. This will cause the ink tank to dry out, and the machine may not operate properly when it is reinstalled. To maintain optimal printing quality, use an ink tank within six months of first use.
NOTE
- Color ink may be consumed even when printing a black-and-white document or when black-and-white printing is specified. Every ink is also consumed in the standard cleaning and deep cleaning of the Print Head, which may be necessary to maintain the machine's performance. When an ink tank is out of ink, replace it immediately with a new one.
1. Make sure that the power is turned on, and open the Paper Output Tray gently.
2. Lift the Scanning Unit (Cover) until it stops.
The Print Head Holder moves to the replacement position.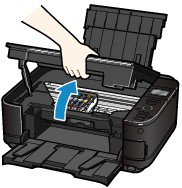
ATTENTION
- Do not hold the Print Head Holder to stop or move it forcibly. Do not touch the Print Head Holder until it stops completely.
IMPORTANT
- Do not place any object on the Document Cover. It will fall into the Rear Tray when the Document Cover is opened and cause the machine to malfunction.
- Be sure to lift the Scanning Unit (Cover) with the Document Cover closed.
- Do not touch the metallic parts or other parts inside the machine.
- If the Scanning Unit (Cover) is left open for more than 10 minutes, the Print Head Holder moves to the right. In this case, close and reopen the Scanning Unit (Cover).
3. Remove the ink tank with the lamp flashing fast.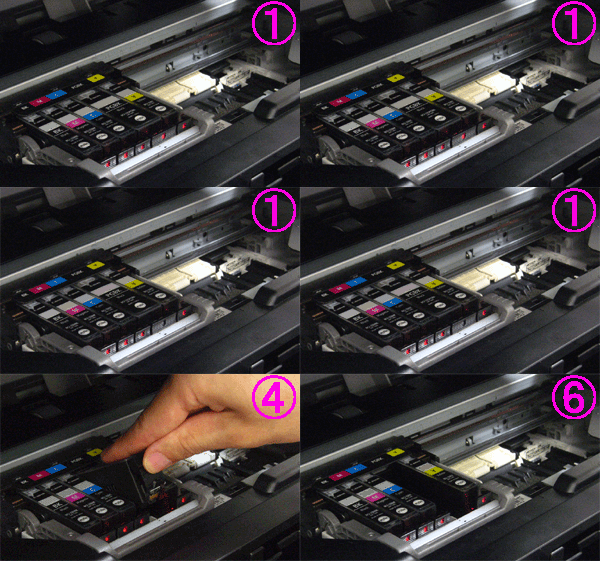
Push the tab (A) and lift the ink tank to remove.
Do not touch the Print Head Lock Lever (B).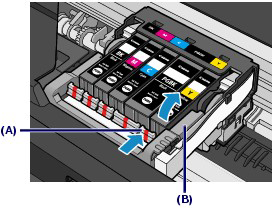
IMPORTANT
- Handle the ink tank carefully to avoid staining of clothing or the surrounding area.
- Discard the empty ink tank according to the local laws and regulations regarding disposal of consumables.
NOTE
- Do not remove two or more ink tanks at the same time. Be sure to replace ink tanks one by one when replacing two or more ink tanks.
- For details on ink lamp flashing speed, see [ Checking the Ink Status ]
4. Prepare the new ink tank.
(1) Take a new ink tank out of its package, remove the orange tape (  ) completely, then remove the protective film (
  ) completely.
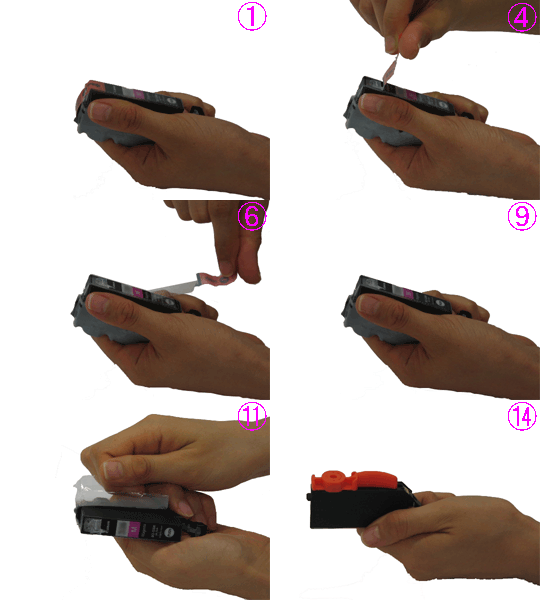
IMPORTANT
- Handle the ink tanks carefully. Do not drop or apply excessive pressure to them.
- If the orange tape remains on the L-shape air hole (C), ink may splash or the machine may not print properly.
(2) Hold the ink tank with the orange protective cap (D) pointing up while being careful not to block the L-shape air hole (C).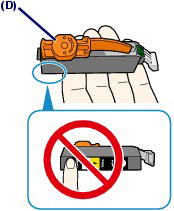
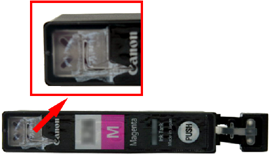
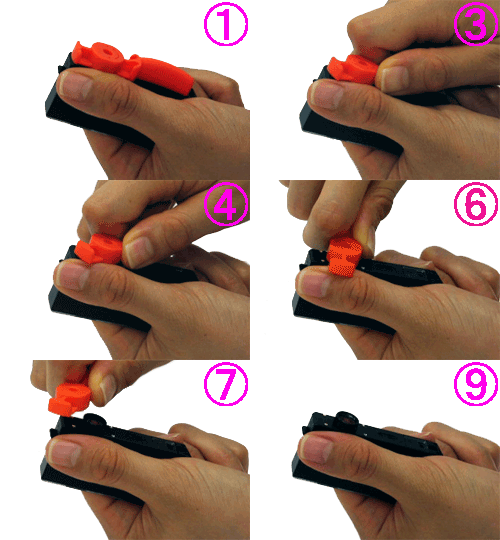
(3) Slowly twist the orange protective cap (D) 90 degrees horizontally to remove it off.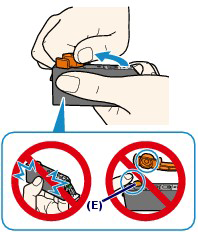
IMPORTANT
- Do not push the sides of the ink tank. If you push the sides of the ink tank with the L-shape air hole (C) blocked, ink may splash.
- Do not touch the inside of the orange protective cap (D) or the open ink port (E). The ink may stain your hands if you touch them.
- Do not reattach the protective cap (D) once you have removed it. Discard it according to the local laws and regulations regarding disposal of consumables.
5. Install the new ink tank.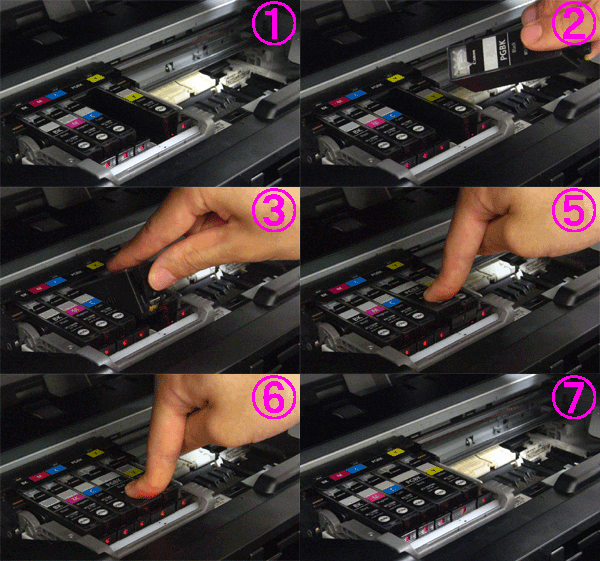
(1) Insert the front end of ink tank into the Print Head at a slant.
Make sure that the position of the ink tank matches the label.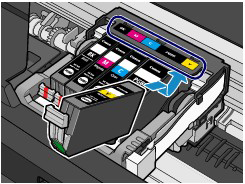
(2) Press the mark  (Push) on the ink tank until the ink tank snaps firmly into place.
Make sure that the ink lamp lights up red.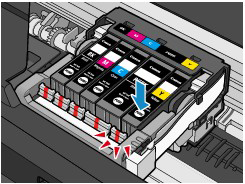
IMPORTANT
- You cannot print if the ink tank is installed in the wrong position. Be sure to install the ink tank in the correct position according to the label on the Print Head Holder.
- You cannot print unless all the ink tanks are installed. Be sure to install all the ink tanks.
6. Lift the Scanning Unit (Cover) slightly, and then close it gently.
NOTE
- If the error message appears after the Scanning Unit (Cover) is closed, refer to [ An Error Message Is Displayed on the LCD ]
- When you start printing after replacing the ink tank, the machine starts cleaning the Print Head automatically. Do not perform any other operations until the machine completes the cleaning of the Print Head.
- If printed ruled lines are misaligned or the print head position is misaligned, adjust the print head position.
See [ Aligning the Print Head ]
The remaining level of the ink cannot be correctly detected. Replace the ink tank. U130
The remaining ink level cannot be correctly detected. (The lamp on the ink tank flashes.)
Replace the ink tank and close the Scanning Unit (Cover).
-> [ Replacing an Ink Tank ]
Printing with an ink tank that was once empty may damage the machine.
If you want to continue printing in this condition, you need to release the function for detecting the remaining ink level. Press and hold the machine's Stop button for at least 5 seconds, and then release it.
With this operation, releasing the function for detecting the remaining ink level is memorized. Please be advised that Canon shall not be liable for any machine malfunction or damage caused by refilled ink tanks.
NOTE
- If the function for detecting the remaining ink level is disabled, the ink tank in gray is displayed on the LCD when checking the current ink level.
-> [ Checking the Ink Status ]
The following ink tank cannot be recognized. U043 U140 U150
- The ink tank is not installed. Install the ink tank.
-> [ Replacing an Ink Tank ]
- The ink tank is not compatible with this machine. (The lamp on the ink tank is off.) Install an appropriate ink tank.
-> [ Replacing an Ink Tank ]
- An ink tank error has occurred. (The lamp on the ink tank is off.) Replace the ink tank.
-> [ Replacing an Ink Tank ]
Appropriate ink tank is not installed. Install the appropriate ink tank U141
Appropriate ink tank is not installed.
Printing cannot be executed because the ink tank is not compatible with this machine.
Install the appropriate ink tank.
-> [ Replacing an Ink Tank ]
If you want to cancel printing, press the machine's Stop button.
The ink has run out. Replace the ink tank. U163
The ink has run out. (The lamp on the ink tank flashes.)
Replace the ink tank and close the Scanning Unit (Cover).
-> [ Replacing an Ink Tank ]
Printing under the current condition may damage the machine.
If you want to continue printing in this condition, you need to release the function for detecting the remaining ink level. Press and hold the machine's Stop button for at least 5 seconds, and then release it.
With this operation, releasing the function for detecting the remaining ink level is memorized. Please be advised that Canon shall not be liable for any malfunction or trouble which may be caused by continuation of printing under the ink out condition.
NOTE
- If the function for detecting the remaining ink level is disabled, the ink tank in gray is displayed on the LCD when checking the current ink level.
-> [ Checking the Ink Status ]
Data of supported types are not saved.
- There is no image data or document saved on the memory card or USB flash drive that can be read by this machine.
- The machine may not recognize the file if the file name or folder path contain certain characters. Use only alphanumeric characters.
- Photo data edited or processed on a computer must be printed from the computer.
NOTE
- When a photo which has been processed on a computer is selected, "?" is displayed on the LCD.
Cannot print the specified PDF file. The format is not supported or the file is too large
- Make sure the PDF file is printable from a memory card or USB flash drive. See [ Printing Documents (PDF File) ] for more information.
NOTE
- The names of the PDF files are displayed even though they cannot be printed from the memory card or USB flash drive. It is recommended you confirm whether they are printable. If one of the following conditions applies to the PDF files, they are not printable.
- The Details screen is not displayed for the PDF file you want to print.
- Characters other than machine name or MP Navigator EX are displayed on Created with on the Details screen.
- "?" is displayed on the preview screen.
- Data edited or processed on a computer must be printed from the computer.
The specified PDF file contains unprintable data. Some portions may not be printed.
PDF file which contain lot of graphics or hi-resolution images may lose that data or stop before printing is completed. In this case, print from the computer.
Inner cover is open. Close the inner cover and press OK
If the Inner Cover is opened, close the Inner Cover and press the OK button on the machine.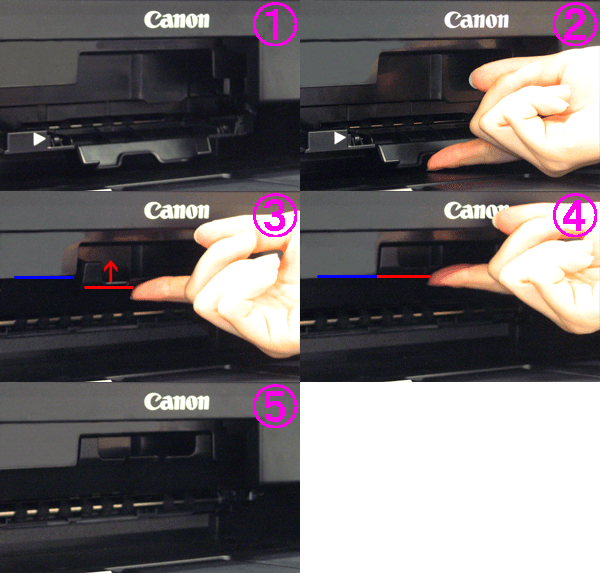
The ink absorber is almost full. Press OK to continue printing. Contact the service center
The ink absorber is almost full.
Press the machine's [OK] button to continue printing. Contact the service center.
Printer error has occurred. Contact the service center
The machine error has occurred.
Contact the service center.
Timeout error has occurred
Some errors occurred while copying and a certain time passed.
Press the OK button to dismiss the error, and try to copy again.
Incompatible device detected. Remove the device
- Check the device connected to the Direct Print Port. Printing photos directly is possible with a PictBridge compliant device or the optional Bluetooth Unit BU-30, or a USB flash drive.
- A communication time out occurs if an operation takes too long or if it takes too much time to send data. This may cancel printing. In such cases, disconnect and reconnect the USB cable. When printing from a PictBridge compliant device, depending on the model or brand of your device, you may have to select a PictBridge compliant print mode on the device before connecting it to the machine. You may also have to turn on your device or select Play mode manually after connecting the device to the machine. Perform necessary operations before connecting your device referring to its instruction manual. If the error is still not resolved, check if you can print another photograph.
Auto head align has failed. Press OK and repeat operation. <See manual>
- Print Head nozzles are clogged. Press the OK button to dismiss the error, and print the nozzle check pattern to check the status of the Print Head.
-> [ Printing the Nozzle Check Pattern ]
- Paper of size other than A4 or Letter is loaded in the Rear Tray. Press the OK button on the machine to dismiss the error, then load a sheet of A4/Letter-sized Canon Matte Photo Paper MP-101 with the printing side (whiter side) facing UP in the Rear Tray. For Automatic Print Head Alignment, always load paper in the Rear Tray.
- The Paper Output Slot is exposed to strong light. Press the OK button to dismiss the error message, and then adjust your operating environment and/or the position of the machine so that the Paper Output Slot is not exposed directly to strong light.
After carrying out the above measures, if the problem continues after aligning the Print Head again, press the OK button to dismiss the error, and then perform Manual Print Head Alignment.
An unsupported USB hub is connected. Remove the hub.
If a PictBridge compliant device is connected via a USB hub, remove the hub and connect it directly to the machine.
B200 Printer error has occurred. Unplug the power cord and contact the service center
Turn off the machine, and unplug the power cord of the machine from the power supply.
Contact the service center.
**** Printer error has occurred. Turn off power then back on again. If problem persists, see the manual
"****" is displayed in the alphanumeric character and depends on the error occurred.
- 5100/5110 is displayed:
Cancel printing, and turn off the machine. Then clear the jammed paper or protective material that is preventing the Print Head Holder from moving, and turn on the machine again.
IMPORTANT
- Be careful not to touch the components inside the machine. The machine may not print out properly if you touch it.
- If the problem is not resolved, contact the service center.
- 6000 is displayed:
If any object is placed in front of the machine, remove it.
Open the Paper Output Tray gently, then turn the power off and back on.
- In other cases:
Turn off the machine, and unplug the power cord of the machine from the power supply.
Plug the machine back in and turn the machine back on.
If the problem is not resolved, contact the service center.
Scanner is not operating correctly
Turn off the machine, and unplug the power cord of the machine from the power supply.
After a while, plug the power cord of the machine back in, and then turn on the machine. If the same error occurs, contact the service center.
The card is currently writable from PC. Set to [Not writable from PC]
The Card Slot is set to Writable from USB PC or Writable from LAN PC.
You cannot print from the memory card or save the scanned data to the memory card when the Card Slot is set to Writable from USB PC or Writable from LAN PC. After writing on the memory card, select Not writable from PC in Read/write attribute in Device user settings.
Power was not turned off correctly the last time. Press the ON button when turning power off
The power cord may have been unplugged last while the machine was still on.
Press the OK button to dismiss the error.
Cannot print the data
The specified data cannot be printed.
When you print the contents on CREATIVE PARK PREMIUM, confirm the message on the computer screen, make sure that genuine Canon ink tanks are installed properly for all colors, then start printing again.
Open the inner cover, set the disc tray and press OK
If the Inner Cover is closed when starting disc label printing, open the Inner Cover with the Scanning Unit (Cover) closed, set the Disc Tray, and then use the OK button on the machine to dismiss the error.
Do not open or close the Inner Cover while printing is in progress. Doing so may damage the machine.
Items to Prepare
The following items are needed to print onto the printable disc:- Disc Tray
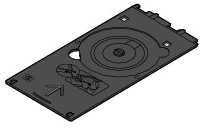
"G" is on the upper side.
- 3.15 inches / 8 cm Disc Adapter

Needed only when printing on 3.15 inches / 8 cm printable discs.
Attached to the Disc Tray when shipped.
IMPORTANT
- You need to print from the computer to print on 3.15 inches / 8 cm printable discs.
- Printable Discs
Obtain a 4.72 inches / 12 cm or 3.15 inches / 8 cm printable disc with a label surface compatible with inkjet printing.
A "printable disc" differs from regular BD/DVD/CDs in that its label surface has been specially processed to be printed on by an inkjet printer.
Cautions When Printing on the Disc Label
- Be sure to use the Disc Tray supplied with this machine. It has an "G" on the upper side.
- Do not print on printable discs that are not compatible with inkjet printing. The ink will not dry and may cause problems with the disc itself or devices which the disc is loaded onto.
- Do not print on the printable discs' recording surface. Doing so will make data recorded on discs unreadable.
- Hold the printable discs by their edges. Do not touch either the label surface (printing surface) or recording surface.
- Remove any dirt from the Disc Tray before placing printable discs on the Disc Tray. Loading discs in a dirty Disc Tray may scratch the recording surface of the discs.
- After printing, allow the printing surface of the disc to dry naturally. Do not use hairdryers or expose the disc to direct sunlight to dry the ink. Do not touch the printing surface until the ink has dried.
- Do not attach the Disc Tray while the machine is in operation.
- Do not remove the Disc Tray while printing on printable discs. Doing so may damage the machine, the Disc Tray, or the disc.
- Do not get dirt or scratches on the reflectors of the Disc Tray. The machine may not be able to recognize loading of the printable disc, or printing may become misaligned. If the reflectors on the Disc Tray become dirty, wipe the reflector clean with a soft, dry cloth, taking care not to scratch the plate.
- The Disc Tray may become dirty if software other than CD-LabelPrint or Easy-PhotoPrint EX is used.
- Always use the supplied 3.15 inches / 8 cm Disc Adapter when printing on 3.15 inches / 8 cm printable discs.
- Always close the Inner Cover after printing on printable discs.
- To keep the print quality at an optimal level, it is recommended to stop printing discs once every ten discs when printing more than ten discs continuously. To stop the printing operation, detach the Disc Tray from the machine, then close the Inner Cover. After approximately three minutes have elapsed, open the Inner Cover, attach the Disc Tray to the machine, then resume printing.
Attaching/Removing the Disc Tray
The external appearance may differ depending on the machine you are using.
- Attaching the Disc Tray
IMPORTANT
- Do not attach the Disc Tray until the message asking you to load the printable disc is displayed. Doing so can damage the machine.
1. Open the Paper Output Tray (A).
2. Make sure that the message asking you to load the printable disc is displayed, then open the Inner Cover (B).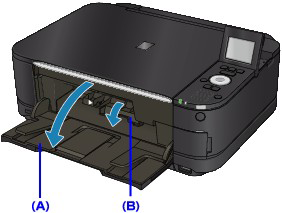
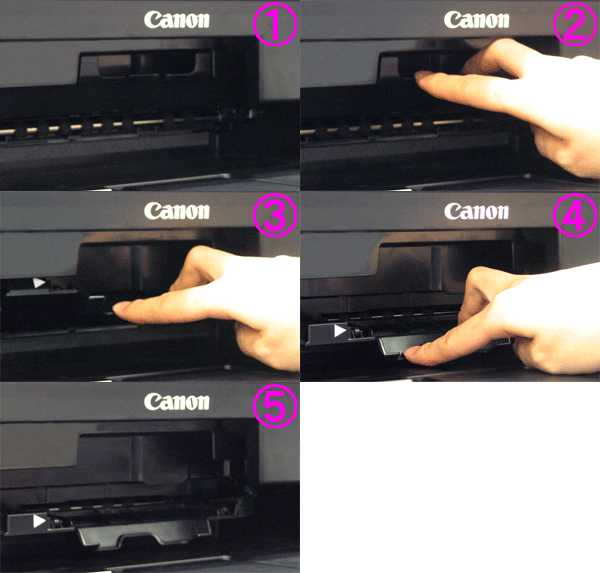
3. Place the printable disc on the Disc Tray.
IMPORTANT
- Make sure that there is no dirt on the Disc Tray before placing a printable disc on the Disc Tray.
- When placing a printable disc on the Disc Tray, do not touch the printing surface of the disc or the reflectors (C) on the Disc Tray.
- 4.72 inches / 12 cm printable disc:
(1) Place the printable disc on the Disc Tray with the printable surface facing up.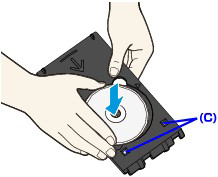
- 3.15 inches / 8 cm printable disc:
(1) Align the protrusions on both edges of the 3.15 inches / 8 cm Disc Adapter with indentations on the Disc Tray.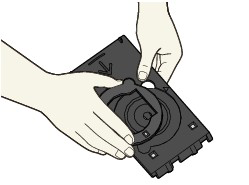
(2) Place the 3.15 inches / 8 cm printable disc on the Disc Tray with the printing surface facing up.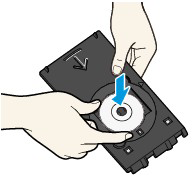
4. Attach the Disc Tray to the machine.
NOTE
- The Disc Tray may be ejected after a specified period of time has elapsed. In this case, follow the on-screen instructions to attach the Disc Tray.
5. Insert the Disc Tray straight until the arrow (  ) on the Inner Cover is almost aligned with the arrow (
  )on the Disc Tray.
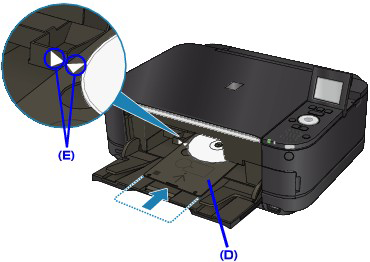
(D) Keep the Disc Tray level when inserting it.
(E) Align the arrow (  ) on the Disc Tray with the arrow (
  ) on the Inner Cover.
IMPORTANT
- Do not insert the Disc Tray beyond the arrow (
 ) on the Inner Cover.
- Removing the Disc Tray
1. Pull out the Disc Tray.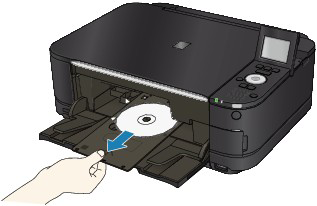
2. Close the Inner Cover.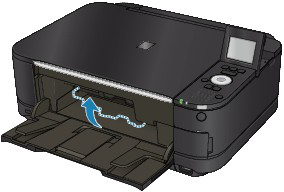

IMPORTANT
- If the Inner Cover is opened, you cannot print on paper as it will not feed properly. Make sure that the Inner Cover is closed.
3. Remove the printable disc from the Disc Tray.
IMPORTANT
- Do not touch the printing surface when removing the disc from the Disc Tray.
NOTE
- Dry the printing surface sufficiently before removing the disc. If you see printing on the Disc Tray or the transparent parts on inner or outer diameter of the printable disc, wipe them off after the printing surface has dried.
- 4.72 inches / 12 cm printable disc:
(1) Remove the printable disc from the Disc Tray.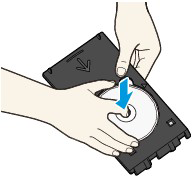
- 3.15 inches / 8 cm printable disc:
(1) Remove the 3.15 inches / 8 cm Disc Adapter from the Disc Tray.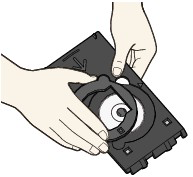
(2) Remove the 3.15 inches / 8 cm printable disc from the Disc Tray.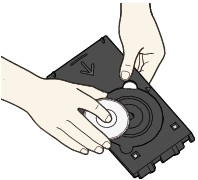
IMPORTANT
- The Disc Tray cannot be used if it becomes warped. Be sure to keep the Disc Tray on a flat place.
Printing on the Disc Label
The Disc Tray (supplied) allows the printing of images on printable discs (BD/DVD/CD etc.).NOTE
- We recommend that you test print on an unneeded printable disc first.
Using Useful Disc Label Printing Functions
Choose either of the method below according to your purpose.
- To copy the label side of source disc onto a printable disc
You can print the label side of the source disc onto a printable disc by loading the source disc on the Platen Glass.
-> [ Copying the Label Side of Disc ]
- To print photo saved on a memory card or USB flash drive onto a printable disc
You can print photo saved on a memory card or USB flash drive onto a printable disc by inserting the memory card into the Card Slot or inserting USB flash drive into the Direct Print Port.
-> [ Printing Photo on the Disc Label ]
- To reprint photo on the disc label
You can print the printed photos on a printable disc by loading the printed photos on the Platen Glass.
-> [ Reprinting Photo on the Disc Label ]
- To print photo onto a printable disc from a PictBridge compliant device
You can print photo onto a printable disc from a PictBridge compliant device by connecting it to the machine.
-> [ Printing Photographs on the Disc Label from a PictBridge Compliant Device ]
- To print photo on the disc label by using the supplied application software
CD-LabelPrint is bundled application software that allows you to edit and modify data before printing. Install it on your computer to use it.
-> [ Printing with CD-LabelPrint from the Computer ]
Copying the Label Side of Disc
Copy the label of an existing BD/DVD/CD and print it on a printable disc.IMPORTANT
- You cannot print on 3.15 inches / 8 cm printable discs.
- Do not attach the Disc Tray until the message asking you to set the printable disc is displayed. Doing so can damage the machine.
1. Display the Copy menu screen.
2. Select  Disc label, then use the OK button to confirm the selection.
The print area setting screen is displayed.
3. Use the 
 button to select Outer circle or Inner circle and use the
 button to change the print area.
4. Use the OK button to confirm the selection.
NOTE
- Measure the outer and inner diameters of the printing surface of the printable disc and make sure you set a value smaller than the measured value for the outer diameter, and a value larger than the measured value for the inner diameter.
- For information on printable discs, contact their manufacturers.
5. Use the 
 button to select Recommended disc or Other disc, then use the OK button to confirm the selection.
NOTE
- If your printable disc is the recommended disc, specify Recommended disc for the suitable density printing. If not, specify Other disc.
6. Load the copy source BD/DVD/CD on the Platen Glass, then use the OK button to go to the next step.
The disc label standby screen is displayed.
IMPORTANT
- Be sure to load the copy source BD/DVD/CD with its label side down on the center of the Platen Glass. If you load it near the edge of the Platen Glass, part of the image may be cut off.
7. Use the Color button for color copying, or the Black button for black & white copying.
8. Confirm the message, then set the printable disc.
Use the left Function button to see how to set the printable disc.
9. Use the OK button to start copying.
The machine starts copying.
NOTE
- Do not see the light source directly while copying is in progress.
- Use the Stop button to cancel copying.
- After printing, allow the printing surface of the disc to dry naturally. Do not use hairdryers or expose the disc to direct sunlight to dry the ink. Do not touch the printing surface until the ink has dried.
- To keep the print quality at an optimal level, it is recommended to stop printing discs once every ten discs when printing more than ten discs continuously. To stop the printing operation, detach the Disc Tray from the printer, then close the Inner Cover. After approximately three minutes have elapsed, open the Inner Cover, attach the Disc Tray to the printer, then resume printing.
Printing Photo on the Disc Label
Print an image saved on a memory card or USB flash drive onto a printable disc.IMPORTANT
- You cannot print on 3.15 inches / 8 cm printable discs.
- Do not attach the Disc Tray until the message asking you to set the printable disc is displayed. Doing so can damage the machine.
1. Display the Fun photo print screen.
2. Select Disc label print, then use the OK button to confirm the selection.
The print area setting screen is displayed.
3. Use the 
 button to change the print area of Outer circle.
4. Use the OK button to confirm the selection.
5. Use the 
 button to change the print area of Inner circle.
6. Use the OK button to confirm the selection.
NOTE
- Measure the outer and inner diameters of the printing surface of the printable disc and make sure you set a value smaller than the measured value for the outer diameter, and a value larger than the measured value for the inner diameter.
- For information on printable discs, contact their manufacturers.
7. Use the 
 button to select Recommended disc or Other disc, then use the OK button to confirm the selection.
The photo selection screen is displayed.
NOTE
- If your printable disc is the recommended disc, specify Recommended disc for the suitable density printing. If not, specify Other disc.
8. Use the 
 button to select the photo to print, then use the OK button to confirm the selection.
9. Adjust the print area and crop the area as necessary.
Use the following buttons to crop the area.

 and
and  buttons:
Positions the cropping frame.
+ or - buttons, or Scroll Wheel:
Sets the cropping frame size.
10. Use the OK button to finalize your selection of cropping area.
The print settings confirmation screen is displayed.
11. Use the Color button to go to the next step.
12. Confirm the message, then set the printable disc.
Use the left Function button to see how to set the printable disc.
13. Use the OK button to start printing.
The machine starts printing.
The photo selection screen is displayed after printing is complete.
NOTE
- Use the Stop button to cancel printing.
- After printing, allow the printing surface of the disc to dry naturally. Do not use hairdryers or expose the disc to direct sunlight to dry the ink. Do not touch the printing surface until the ink has dried.
- To keep the print quality at an optimal level, it is recommended to stop printing discs once every ten discs when printing more than ten discs continuously. To stop the printing operation, detach the Disc Tray from the printer, then close the Inner Cover. After approximately three minutes have elapsed, open the Inner Cover, attach the Disc Tray to the printer, then resume printing.
Reprinting Photo on the Disc Label
Print an image on a printed photo onto a printable disc.IMPORTANT
- You cannot print on 3.15 inches / 8 cm printable discs.
- Do not attach the Disc Tray until the message asking you to set the printable disc is displayed. Doing so can damage the machine.
1. Display the Reprint from printed photo screen.
2. Select  Disc label print, then use the OK button to confirm the selection.
The print area setting screen is displayed.
3. Use the 
 button to select Outer circle or Inner circle and use the
 button to change the print area.
4. Use the OK button to confirm the selection.
NOTE
- Measure the outer and inner diameters of the printing surface of the printable disc and make sure you set a value smaller than the measured value for the outer diameter, and a value larger than the measured value for the inner diameter.
- For information on printable discs, contact their manufacturers.
5. Use the 
 button to select Recommended disc or Other disc, then use the OK button to confirm the selection.
The photo selection screen is displayed.
NOTE
- If your printable disc is the recommended disc, specify Recommended disc for the suitable density printing. If not, specify Other disc.
6. Use the 
 button to select the photo to print, then use the OK button to confirm the selection.
NOTE
- If
 appears on the photo, the photos may be not scanned properly. Rescan the photo by using left Function button.
7. Confirm the print image, then use the OK button to go to the next step.
The print settings confirmation screen is displayed.
NOTE
- You can also crop the print area again by using the center Function button.
8. Use the Color button for color printing, or the Black button for black & white printing.
9. Confirm the message, then set the printable disc.
Use the left Function button to see how to set the printable disc.
10. Use the OK button to start printing.
The machine starts printing
NOTE
- Use the Stop button to cancel printing.
- After printing, allow the printing surface of the disc to dry naturally. Do not use hairdryers or expose the disc to direct sunlight to dry the ink. Do not touch the printing surface until the ink has dried.
- To keep the print quality at an optimal level, it is recommended to stop printing discs once every ten discs when printing more than ten discs continuously. To stop the printing operation, detach the Disc Tray from the printer, then close the Inner Cover. After approximately three minutes have elapsed, open the Inner Cover, attach the Disc Tray to the printer, then resume printing.
Printing Photographs on the Disc Label from a PictBridge Compliant Device
This section describes how to print photos onto printable discs from a PictBridge compliant device.IMPORTANT
- Depending on your PictBridge compliant device, you may not be able to print on the label side of discs.
- For details, refer to your PictBridge compliant device's instruction manual.
- You cannot print on 3.15 inches / 8 cm printable discs.
- Do not use the USB cable longer than around 10 feet / 3 meters to connect any PictBridge compliant device to the machine since it may affect the operation of other peripheral devices.
1. Make sure that the machine is turned on.
2. Connect the PictBridge compliant device to the machine using a USB cable recommended by the manufacturer of the device.
3. Specify the print settings as follows.
- Paper size: Size for 4.72 inches / 12 cm printable disc
- Paper type: Default
- Layout: Bordered or Default
NOTE
- If your PictBridge compliant device does not have setting menu, change the setting from the machine.
4. Set the printable disc.
5. Start printing from your PictBridge compliant device.
- Specifying the PictBridge Print Settings on the Machine
You can specify the PictBridge print settings on the machine.
NOTE
- When a PictBridge compliant device is connected to the machine, the PictBridge print settings screen can also be displayed by using the left Function button.
1. Make sure that the machine is turned on.
2. Select  Setup on the HOME screen.
3. Select  Device settings, then use the OK button to confirm the selection.
4. Select PictBridge print settings, then use the OK button to confirm the selection.
5. Confirm the message, then use the OK button to go the next step.
6. Select Disc label print setting, then use the OK button to confirm the selection.
The screen to change the print area is displayed.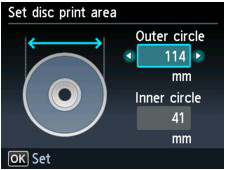
7. Use the 
 button to select Outer circle or Inner circle and use the
 button to change the print area.
8. Use the OK button to confirm the selection.
NOTE
- Measure the outer and inner diameters of the printing surface of the printable disc and make sure you set a value smaller than the measured value for the outer diameter, and a value larger than the measured value for the inner diameter.
- For information on printable discs, contact their manufacturers.
9. Use the 
 button to select Recommended disc or Other disc, then use the OK button to confirm the selection.
NOTE
- If your printable disc is the recommended discs, specify Recommended disc for the suitable density printing. If not, specify Other disc.
Printing with CD-LabelPrint from the Computer
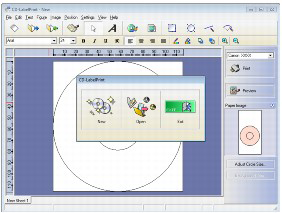
- CD-LabelPrint is bundled application software that allows you to edit and modify data before printing. Install it on your computer to use it. To install this software, insert the Setup CD-ROM into the computer's disc drive, then perform Custom Install and select CD-LabelPrint.
- For details on how to print with CD-LabelPrint, refer to its manual. Click Start > All Programs > CD-LabelPrint > Manual.
 Printing a Disc Label
Applicable Models
- PIXMA MG5240
- PIXMA MG5250