Converting RAW images to JPEG or TIFF using Digital Photo Professional 3.0 - 3.14
FAQ ID: 8201532900
Release date: 18 May 2015
Solution
IMPORTANT
- In order to perform this operation, it is necessary to install [Digital Photo Professional] from the CD-ROM (EOS DIGITAL Solution Disk) supplied with the product.*
* If the EOS DIGITAL Solution Disk was not included with your camera, please download it from the Canon homepage.
- Operations for [Digital Photo Professional ver3.13] are explained here. For other versions, the screens displayed and operation procedures may differ slightly.
- In this section, the example procedure is shown in Windows 7. Menu items, screens displayed, and procedures may differ depending on the operating system installed on the computer.
- Make sure to download the RAW images you want to convert beforehand.
1. Double-click the [Digital Photo Professional] icon that appears on the desktop.

If you cannot find the [Digital Photo Professional] shortcut icon on your desktop, click [Start] ( ) > [All Programs] or [Programs] > [Canon Utilities] and select [Digital Photo Professional] to start [Digital Photo Professional].
2. When [Digital Photo Professional] starts, the following window appears.
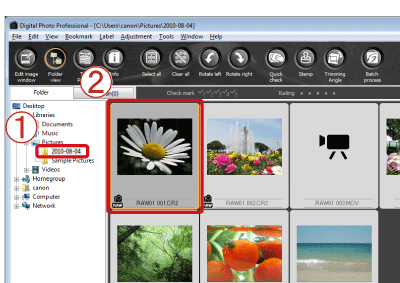
 Select the folder in which the image you want to convert is saved. (Images are saved to the [My Pictures] folder by default)
 Double-click and select the RAW image you want to convert to JPEG or TIFF.
3. The following window appears.
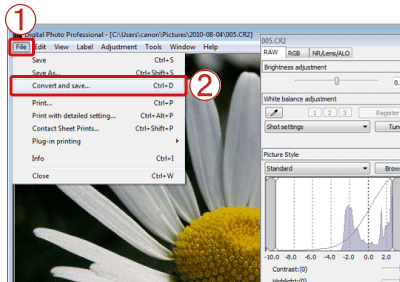
Click [File], and from the menu that appears, click [Convert and save].
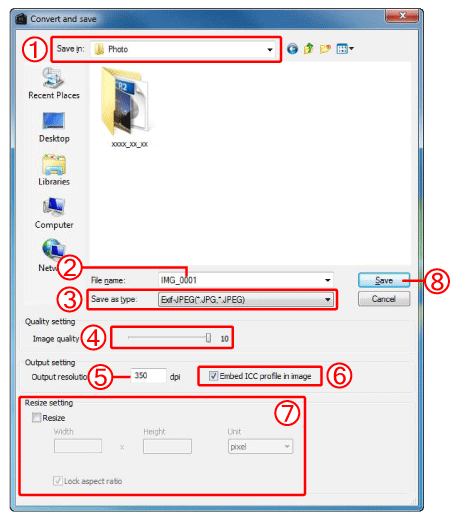
4. The following window appears.
| Number | Item | Comments | ||||||||||||
|---|---|---|---|---|---|---|---|---|---|---|---|---|---|---|

|
Save Destination |
|
||||||||||||

|
File Name |
|
||||||||||||

|
Image type | Select the type of image you want to save from those listed below.
|
||||||||||||

|
JPEG compression rate | The setting range is 1 to 10. The higher the numerical value, the higher the image quality becomes. | ||||||||||||

|
Resolution | The setting range is 1 to 60,000 dpi. | ||||||||||||

|
Embeds of ICC profiles | Color space information that is set in an image is attached to an ICC profile. | ||||||||||||

|
Size changing | The larger of the two values set in [Width] and [Height] is applied to the longer edge of an image and change its size. |
NOTE
Some versions include shooting information settings. Please select the desired setting if applicable.

5. Set all the items, then press the  [Save] button.
The RAW image is converted to a JPEG or TIFF image which is then saved as a new image in the specified save destination.
REFERENCE
Even if you remove the check mark from images that have been set to Apple RGB, ColorMatch RGB or Wide Gamut RGB color space, the ICC profiles are embedded automatically.
NOTE
- You can also save an unedited copy of an image as a separate image.
- When using linear processing, select [TIFF 16bit] to save.
- The color space in the preferences or one that is set individually is written in the ICC Profile, which is embedded in JPEG and TIFF images. An ICC profile is a file containing information related to color, such as the color properties and color space that the International Color Consortium has established for each device. Many management systems let you minimize color differences between devices using this ICC profile.
- [Resize setting] lets you resize an image by applying the larger of the values set in [Width] or [Height] to the long side of the image even if there is a mixture of images shot horizontally and vertically.
IMPORTANT
- To save the developing/editing results for the version you are currently using
Digital Photo Professional’s RAW image development processing technology is continually being improved upon so that you can perform the latest image processing more appropriately.
Meaning that, between two differing versions of Digital Photo Professional , processing results may differ very slightly even if with the same RAW image data, or the results of significant editing of RAW image data with an attached recipe may be different. When you want to save the developing or editing results of the version you are currently using as it is, it is recommended that you convert and save images as JPEG image or TIFF images.
Applicable Models
- EOS 1000D
- EOS 100D
- EOS 10D
- EOS 1100D
- EOS 1200D
- EOS 1D
- EOS 1Ds
- EOS 20D
- EOS 20Da
- EOS 300
- EOS 30D
- EOS 350D
- EOS 400D
- EOS 40D
- EOS 450D
- EOS 500D
- EOS 50D
- EOS 550D
- EOS 5D
- EOS 5D Mark II
- EOS 5D Mark III
- EOS 600D
- EOS 60D
- EOS 60Da
- EOS 650D
- EOS 6D
- EOS 700D
- EOS 70D
- EOS 7D
- EOS 7D Mark II
- EOS D60
- EOS M
- EOS M2
- EOS-1D Mark II
- EOS-1D Mark II N
- EOS-1D Mark III
- EOS-1D Mark IV
- EOS-1D X
- EOS-1Ds Mark II
- EOS-1Ds Mark III