How to setup the printer
FAQ ID: 8200721500
Release date: 24 December 2009
Solution
Check the Included Items
Check that all the items shown below are included in the box.
- Setup CD-ROM (containing the drivers, applications and on-screen manuals)
- Other documents
REFERENCE
- A USB cable is necessary to connect the printer with your computer.
Remove the Protective Material
1.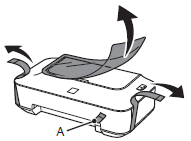
Remove all the protective materials and orange tape from the outside of the printer.
Do not remove the orange tape (A) on the front side yet.
REFERENCE
The tape and protective materials may differ in shape and position from what they actually are.
2. 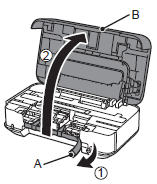
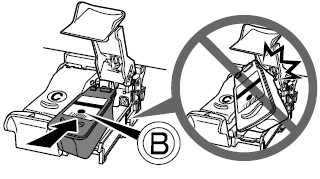
Remove the orange tape (A) on the front side as shown (1), then open the Front Cover (B) (2).
3. 
Remove the orange tape on the front side carefully.
The protective material (C) is removed along with the orange tape on the front side.
4. 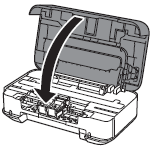
Close the Front Cover.
Turn the Power On
IMPORTANT
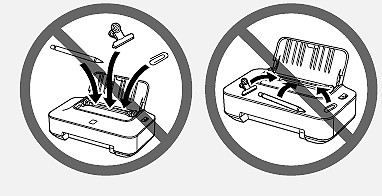
- Do not install the printer where an object may fall on it. The object may fall inside the printer, resulting in malfunction.
- Do not place any object on top of the printer. It may fall into the printer when opening covers, resulting in malfunction.
1. 
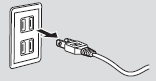
Insert the power cord into the connector on the left side of the printer and into the wall outlet.
IMPORTANT
- Do NOT connect the USB cable at this stage.
2. 
Press the ON button (A) to turn on the printer.
3. 
Make sure that the POWER lamp (B) lights green.
- Turning the power off -
Be sure to follow the procedure below.
(1) Press the ON button (A) to turn off the printer.
(2) Make sure that the POWER lamp (B) is not lit.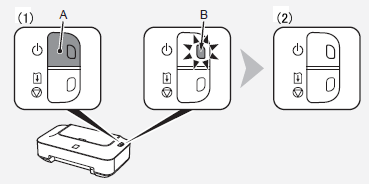
Operating noise may continue for up to 25 seconds until the printer turns off.
IMPORTANT
When removing the power plug, make sure that the POWER lamp is not lit before removing the plug. Removing the power plug while the POWER lamp lights up or flashes may cause drying and clogging of the FINE Cartridges, resulting in poor printing.
REFERENCE
The specification of the power cord differs for each country or region.
Install the FINE Cartridges

1. 
Open the Front Cover (A).
IMPORTANT
- When opening the Front Cover, the FINE Cartridge Holder moves automatically.
- If the FINE Cartridge Holder does not move, make sure that the printer is turned on.
- If the Front Cover is left open for more than 10 minutes, the FINE Cartridge Holder moves to the right. In this case, close and reopen the Front Cover.
2. 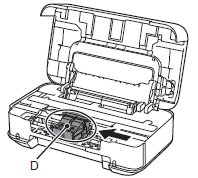
Make sure that the FINE Cartridge Holder (D) moves to the installation position.
3. 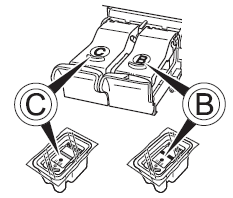
Follow the next procedure to insert the Black  and Color
  FINE Cartridges into their corresponding slots and .
4. 
Open the Ink Cartridge Locking Cover on the right side.
Pinch (E) firmly and pull up the cover.
5. 
Remove the Black FINE Cartridge from its package.
IMPORTANT
- Handle the FINE Cartridges carefully. Do not drop or apply excessive pressure to them.
- Be sure to use the supplied FINE Cartridges.
- Be careful not to stain your hands or surrounding work area with ink on the removed protective tape.
- Do not touch the electrical contacts (G) or print head nozzles (H) on a FINE Cartridge. The printer may not print properly if you touch them.
6. Pull the orange protective tape (F) in the direction of the arrow and remove it carefully.
7. 
Place the Black FINE Cartridge into the right slot .
IMPORTANT
- Do not knock the FINE Cartridge against the sides of the holder.
- Install the Black FINE Cartridge into the right slot , and the Color FINE Cartridge into the left slot .
8.
Push down of the Ink Cartridge Locking Cover until you hear a click to close it completely.
View the Ink Cartridge Locking Cover straight on and check that it is locked correctly (not at an angle).
9. 
Insert the Color FINE Cartridge into the left FINE Cartridge Holder in the same way as the Black FINE Cartridge.
10.
Close the Front Cover.
11.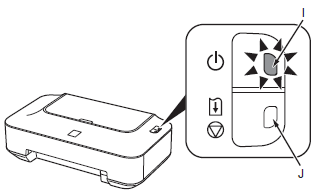
Wait until the POWER lamp (green) (I) stops flashing and stays lit, and proceed to the next step. It takes about 2 minutes until the POWER lamp stops flashing and stays lit.
IMPORTANT
- Once you have installed the FINE Cartridges, do not remove them unnecessarily.
- If the Alarm lamp (J) flashes orange, make sure that the FINE Cartridges are correctly installed.
Load Paper
1.
Open the Paper Support (A).
2. 
Move the Paper Guides (B) to both edges.
3. 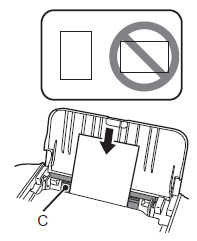
Load paper in the center of the Rear Tray (C).
Load paper in portrait orientation with the printing side facing up.
4. 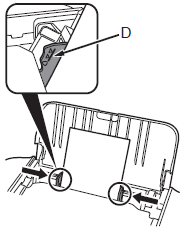
Slide the left and right Paper Guides against both edges of the paper.
Make sure that the height of the paper stack does not exceed the line (D).
Applicable Models
- PIXMA iP2700
- PIXMA iP2702