How do I crop (trim) an image or make angle adjustments using Digital Photo Professional Ver.4.x?
FAQ ID: 8202117400
Release date: 28 January 2020
Solution
You can crop only the part of an image you need, or change the composition of an image where an image shot horizontally becomes vertical using the trimming tool in Digital Photo Professional Ver. 4.x. You can also adjust the angle of an image before cropping.
The cropped RAW image actually becomes a cropped image when converted to a JPEG or TIFF image and saved.
1. Start up Digital Photo Professional Ver. 4.x, and then select the image to be trimmed.
2. Select [Tool palette] from the [View] menu on the toolbar to display the [Tool palette]. 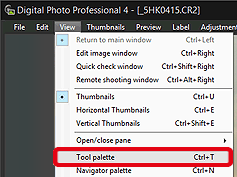
3. Click the [  ] tab on the [Tool palette] to display the trimming/angle adjustment window.
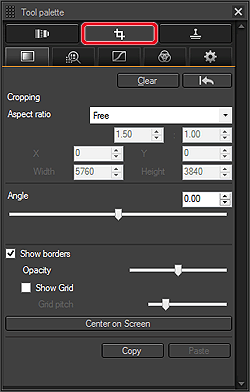
- You cannot make adjustments with the Trimming/Angle Adjustment tool palette in a window that only shows thumbnails.
4. Adjust the angle of the image as needed.
- It is possible to change the adjustment angle (0.01-degree increments; adjustable range: –45 to +45 degrees)
- If you click [
 ] on the tool palette after adjusting only the angle of the image, the image will be trimmed at the largest possible trimming range.
NOTE
When correcting lens aberrations, it is recommended to perform lens aberration correction before adjusting the angle of the image.
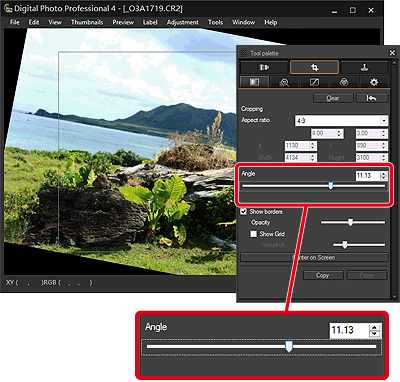
5. When the image has become clear, select an aspect ratio and drag the trimming range.
 Select an aspect ratio.
[Free]: You can crop an image to any size, regardless of the selectable ratio.
[Custom]: You can crop an image at the specified ratio.
 Drag the trimming range to select the desired area.
The trimming range can be moved by dragging. You can enlarge or reduce the size of the trimming range by dragging the four corners of the trimming range.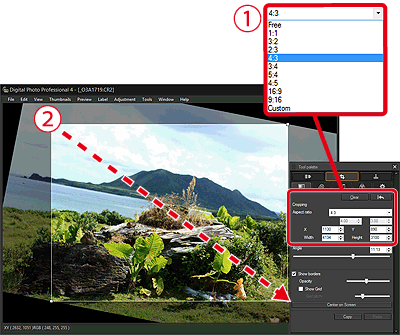
6. Click [  ] on the tool palette to perform image cropping. Then, return to the main window.
The trimming range frame is displayed in the cropped image.
- Edit image window display
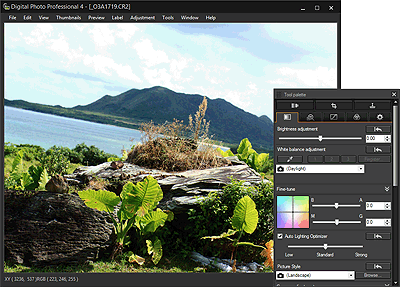
- Main window display
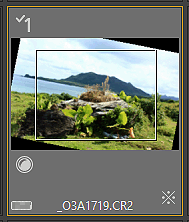
A cropped image is displayed or printed as a cropped image. However, since the image is not actually cropped, you can always revert to the original image by clicking the [  ] button in the trimming/angle adjustment window or re-editing the image.
To actually crop the image, convert the trimmed image into a JPEG or TIFF image and save it.
7. Select the [File] menu -> [Convert and save].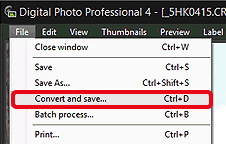
8. The [Convert and save] window appears. Specify the necessary settings, and then click the [Save] button.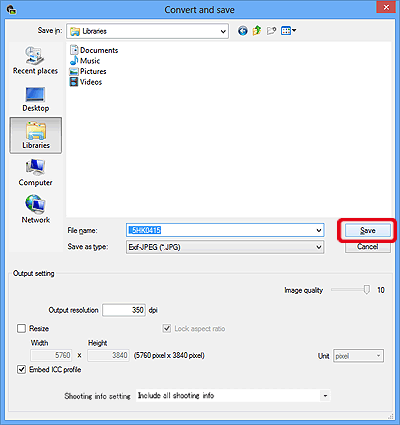
This completes the procedure for cropping (trimming) images or making angle adjustments.
Applicable Models
- EOS 1000D
- EOS 100D
- EOS 1100D
- EOS 1200D
- EOS 1300D
- EOS 2000D
- EOS 200D
- EOS 20D
- EOS 20Da
- EOS 250D
- EOS 30D
- EOS 350D
- EOS 4000D
- EOS 400D
- EOS 40D
- EOS 450D
- EOS 500D
- EOS 50D
- EOS 550D
- EOS 5D
- EOS 5D Mark II
- EOS 5D Mark III
- EOS 5D Mark IV
- EOS 5DS
- EOS 5DS R
- EOS 600D
- EOS 60D
- EOS 60Da
- EOS 650D
- EOS 6D
- EOS 6D Mark II
- EOS 700D
- EOS 70D
- EOS 750D
- EOS 760D
- EOS 77D
- EOS 7D
- EOS 7D Mark II
- EOS 800D
- EOS 80D
- EOS 90D
- EOS M
- EOS M2
- EOS-1D C
- EOS-1D Mark II
- EOS-1D Mark II N
- EOS-1D Mark III
- EOS-1D Mark IV
- EOS-1D X
- EOS-1D X Mark II
- EOS-1D X Mark III
- EOS-1Ds Mark II
- EOS-1Ds Mark III